Commands
For flight control following commands are available in UgCS:
Command | Description |
|---|---|
Upload | Upload current mission to vehicle. See the command result in the log window. |
Arm \ Disarm | Activates \ deactivates all systems and makes the vehicle ready for flight. See the command result in the log window. |
Auto \ Manual Mode | Setting selected vehicle to Auto or Manual mode. When in Auto, the vehicle starts execution of the uploaded mission (if Armed). |
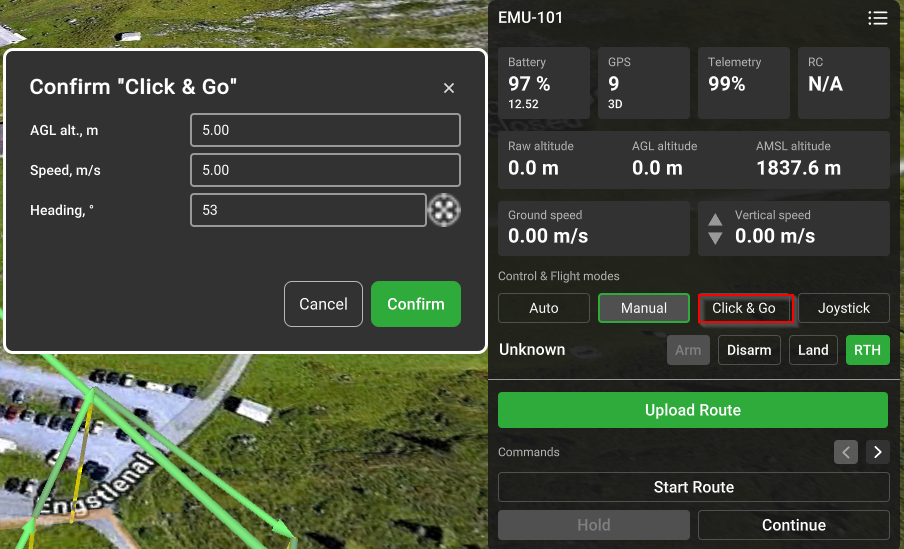
Click & Go | When pressing the “Click & Go” button, double-click or SHIFT+click on the map to define the target waypoint. If the command is sent successfully vehicle will move toward the specified point (if Armed). The dashed line, connecting the vehicle and the target point will be displayed. Hovering the point head will show the distance to approach and the estimated time. |
Joystick | Enable joystick control mode. See the Joystick section for more information |
Hold | Suspends current operation. In the case of an execution mission (Auto mode) put it on hold. In the case of Click & Go - the flight stops the vehicle (loiter around the current position in the case of the plane) and clears the current target point. In the case of Landing holds landing. |
Continue | Continues mission execution from the point where the mission is put on hold. |
Land | Lands the vehicle at the current point. |
Return Home | Returns the vehicle to the Home Point.
|
Emergency land | Sending command to make emergency land.
|
Set home | Set current location like home. |
Camera trigger | Camera-triggering commands are sent through DJI Mobile SDK. |
Click & Go command
Click & Go mode allows to interactively command vehicles to fly to a target location by clicking on the map. Once the location is reached, the copter will hover at the reached location, waiting for the next command. This behavior is implemented as a mini-mission containing two waypoints: current drone position and target point.
To start the Click & Go mission, set a target point on the map to which the copter has to fly and confirm it.
- Click the "Click & Go" command;

- Click on the map to set the target point;
- Adjust additional parameters “AGL alt”, “Speed” and “Heading” if needed and confirm to send the command to the drone;
- Press the green check button or the Enter key to confirm.
The heading is the angle between the north direction and the vehicle bow. By default, “Heading” is set collinearly according to the flight direction. The drone will fly to the new target point at the set “Heading” angle after the command is sent to the vehicle. If the “Heading” field is left blank (not 0, but empty) - the vehicle will fly using the current heading. It is also possible to adjust the heading by moving the arrow of the target waypoint.
When performing Click & Go mode for a drone on the ground it firstly flies up to “Minimal safe altitude” (default – 5m, can be changed at Settings – Drone Specific Settings) and then proceeds to the selected point.
It may be necessary to set the Take-off point altitude (Take-off point altitude).
If an action trigger (Camera by time, Camera by distance, etc.) is interrupted with the Click & Go command, this action will not be performed after clicking the Continue button. Actions at the next waypoints will work as usual.
The continue button will be inactive if the Click & Go action is interrupted i.e. by pressing the Hold button.
Updated 3 months ago
